
Your meal on Thanksgiving Day (or any other Fall time gathering) will be incredible but how about making your guests smile before the eating even begins?
Here’s a very simple and easy to do (and easy on your purse strings!) way to make your table/home look fantastic. It’ll require you to go outside and gather up lots of Autumn leaves and then come back inside to have a cup of warm cider or tea but I think you can handle it. : ) You’ll need to get out soon and do your gathering as the leaves come and go much too quickly and suddenly the ground is white with snow instead of the
bright hues of swirling leaves.
bright hues of swirling leaves.
After you have picked up the dry, fresh and clean leaves put them into a Tupperware container. I use an oblong one, like a 9x13 or similar. Spread leaves out and place a magazine or a thin telephone book on top of them to keep them flat. Cover and put the container in the freezer. The day of the festivities, take the container out of freezer. When you are ready to set your table, simply spread the leaves over the tablecloth! Your guests will wonder where on Earth you found leaves at that time of year because they’re so colorful and fresh. Other uses? You could use them as a place card---write names of guests with a marker and put the leaf on their plate. How about lining a hallway ---put leaves against the walls of your foyer (out of the way, so no one slips on them)—What a terrific way to be welcomed---walking through a pathway of leaves! Sprinkle the leaves across a hutch or sideboard where your desserts/beverages are being served. Perhaps take a piece of double stick tape and put some leaves all over some sure to be seen windows or on a mirror that guests will use. So simple to grace your home with a blaze of Fall that is sure to make all say, “Oh, how wonderful.”


~~~~~~~~~~~~~~~~~~~~~~~~~~~~~~~~~~~~~~~~~~~~~~~~
Like a scene from a movie most of us have played a real life role in:
As many other moms and dads have done, I went into my son’s room after he moved out permanently. I sat on the bed and took a good look around. I wondered how the time went so fast…how did this room that holds so many of the keys and clues to his upbringing suddenly become so empty? And what the Washington, DC area gained in our son moving there, his family lost in some way. Though he’s happy in his new home and has the job of his dreams, there is still an echo of him in his old room. I suppose that’s how it always will be. And should be, really. But after a few weeks of that certain kind of “mourning”, I went back into that room and said, “Wow, I can re-decorate!!” And to salute my son, who is a movie buff of gigantic proportions, I put away the things that high school and college placed there and turned the area into a Media Room of sorts. With new paint and some movie style furnishing and designing, we have a fun and unique place to watch movies, eat popcorn and well, for me, maintain a constant supply of Juji fruits or the cinema experience won’t be complete! And here’s a happy ending for you: the room has a sleeper couch so the young man we miss so much has a soft place to lay his handsome head when he comes to visit. Annnnnnnnnd, that’s a wrap….
Welcome to The JMG Movie Theatre:

The mantle has a couple of framed stills from the movie, Some Like It Hot, a family favorite. The popcorn boxes hold candy--looks like the cinema needs to be re-stocked! The string of lights looks great in the dark room during film time.

We keep the dvd's in a folder so what to do with all those empty cases? Well, this idea works beautifully! Buy a framed canvas at a craft store--they come in many sizes and are inexpensive--and simply glue the cases onto the canvas. I placed them so that they overhang the sides by a couple of inches---it looks awesome on the wall, like the cases are suspended in air. It's a charming way to recycle the cases and to have something movie theme oriented taking center stage in the room.

This was an existing light fixture. I took the popcorn box and cut a hole in the bottom to fit the fixture. A low watt bulbs gives it a soft glow. It looks marvelous when lit.

These coasters wanted in on the action, so I slid in old movie stubs!
So whether you walk down the Yellow Brick Road or go Driving With Miss Daisy or watch as someone saves Private Ryan, treat yourself to some relax and unwind time. There's a popcorn box waiting with your name on it!
Need a simple and eye catching centerpiece? Let Mother Nature and a few items you may already have help you create something wonderful. It will require you to go outside on a beautiful Autumn day and gather fresh, colorful leaves...You can handle that, right? : )
What you need: a large, clear hurricane style candle holder, a clear candy dish or something similar that will sit on the rim of the hurricane candle holder and a scented pillar candle. Simply fill the large holder with the fresh leaves, making sure the colorful sides face out. Then place the candy dish on top. Put candle in and there you go....Simple, creative, inexpensive and sure to cause a smile. I made the one below 2 week ago and the leaves are still vibrant. At other times of the year, the design could be changed---fill container with pretty ornaments, sea shells, sand, vintage buttons, small gourds, packages of seeds, painted eggs, etc. The sky is the limit. So fly, my friends, fly.

************************
************************
Doors aren't just an opening into a room. They can also open up the imagination to UNIQUE CHIC at its' very best. These photos show how they make an impact in my families' sports memorabilia room---a place commonly referred to as the "Man Cave". In our house, the ladies enjoy watching sports as well, so if those hinged together doors could talk they'd have quite some tales to tell about Sunday afternoon game gatherings and fans jumping on the ottoman to celebrate a great play. (Yes, even Mom, who should know better...) The items on the doors are from my husband's sporting days and also from his father's---both of whom were very accomplished hockey and baseball players but most of all, exceptional human beings on and off the field. I was fortunate to have found these doors in the barn on our property when we bought our home. But they can also be found at the end of a driveway with a FREE sign on them, at yard sales, in selvage places and antique shops....or ask your family and friends---someone may have some old doors laying around. Just gather 3 or more and use heavy hinges to connect them together. You can paint them all in one color or mix and match to go with the room they're in. Or leave them as they are, old and banged up will never go out
of style in decorating. Or in people, I say.


Fruit of the vine makes a light so fine
When you're done drinking that wine, you can turn the bottle into a simple and elegant light for any occasion by using different ribbons or raffia, varying colors and candles and even printing out a personalized label. These festive additions to your table, patio or just about anywhere in or outside of your home will add that extra shine we all adore. And these Vino Lights are so easy and inexpensive.
Go from this:
Go from this:

To this:


Supplies needed:Wine bottle (ask friends/neighbors for one if you don't partake), a votive holder, candle, strong glue that works on glass, ribbons or raffia, glass marbles (for weight to keep bottle from tipping over--you could also use sand or small stones), any kind of embellishment for the ribbon/raffia--I used a glass leaf. You could also use a vintage pin or old earring, a unique button, etc. FYI-Other bottles would work--one that is unique looking or has some special meaning. Use your imagination! Simply fill the bottle with marbles about a third of the way up. Then tie your ribbon or raffia around bottle neck and glue (I used glue gun for this part) on any embellishments. Put some Superglue or other choice on the opening of bottle and place the votive holder on top. Look down from above to center the votive on the opening. Press down and hold for a few minutes. Add candle.
Easy or what?
Here's another example of one I made for a friend. Her initials are on the card attached to ribbon. You could use names, dates, etc. that are important--makes a great centerpiece for a wedding--just use the names of the bride and groom and the date of their special day. You can also print out your own label, which makes a fabulous housewarming gift..."Welcome to the Lewis Home, Est. 2010". The possibilities are endless so take a take a stroll on creativity road.
See you there!

Tissue boxes, lampshades and flowers, oh my!
I'm a big fan of turning one thing into something completely new and different. Let me show you what I mean. You think you need a vase to display your floral arrangements? Think again, my friends!


Yes, this was a tissue box. I used tissue paper, ribbon, a small plastic cup that fits nicely in the box and a $4.00 bouquet of flowers that I enhanced with some hydrangeas from my garden. What I like about this is that it incorporates recycling, vast creativity since tissue boxes come in lots of designs, is very inexpensive and easy to put together. This is a great craft for a child to do with your help--wonderful gift for a teacher, grandma's birthday, etc.
* * * * * * * * * * * * * * * * * * * * * * *
* * * * * * * * * * * * * * * * * * * * * * *
And you thought it only covered a light bulb...


This is a lampshade turned upside down. I placed a bowl inside of it that fit nicely. These hydrangeas are a perfect and simple compliment to the design and color of the shade. You can use a lampshade that you already have or pick one up at a place like Home Goods or Christmas Tree Shop (which should be named "Come in for one thing and go home with 62!!"). And, of course, be on the lookout for them at yard sales and consignment stores.
~*~*~*~*~*~*~*~*~*~*~*~*~*~*~*~*~*~
Tis the season for adding that extra glow to our homes and here are a few things that I've done to my own so far. Use your imaginations and your creativity to bring that holiday shine to your house. There is no limit to the kinds of items you can buy or find in your own backyard. (And remember to check consignment shops). I don't spend very much each year---I add a few things, here and there, but mostly I use what I already have in new and different ways. And well, the country girl in me loves to walk in the woods behind my house to find evergreens, berries and pine cones. Add your own touches, your own pizzazz. And soon, your halls will be decked and even Jack Frost will be peeking in to see what wonders you've created.
Mantel in sports themed family room: pinecones, branches, small wicker balls, brown raffia, candles and lights:

Mantel in parlor-a collection of Santas, evergreens, gold roping and festive napkins used as a runner.

A book adds a nice touch to the wreath above mantel:

Even the powder room gets a Christmas touch:

Empty wine bottles sport holiday stoppers of ornaments and the candle holder is an upside down wine glass:

The family photos get some winter whimsy by simply adding red bulbs and a wreath:

Table in center of parlor:

Wrapping small boxes and adding these tags of
wonderful words is a nice touch. These "gifts" greet
visitors in my foyer.

except for the ribbon, of course.


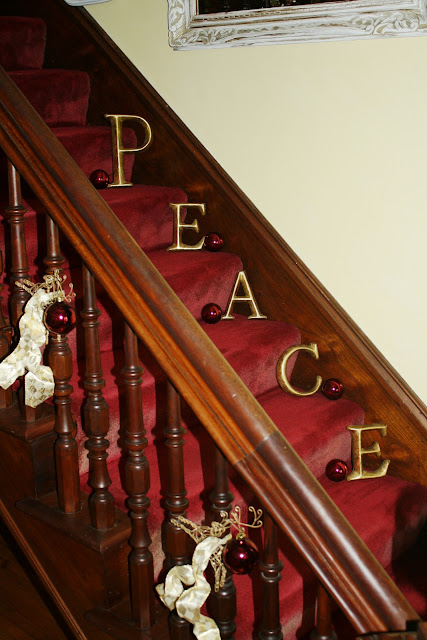
The bannister wanted some "bling":

What I hope you have this holiday season and all the year through can be found in the word on my stairs:
I made this look old by burning the edges of the paper, like it was an announcement from a long time ago.

The powder room mirror has its' own glow:

Reindeer flying up the staircase:

The hitching post outside--evergreens from the woods, ribbon and a red curtain tieback.

This speaks for itself---the words on the sign and the portrait below it:

This is as simple as it gets---a plastic snowflake ornament that I cut the inside out of, enough to slide over the candle.

This centerpiece is made of assorted bulbs placed on top of various sized glass candle holders:

The front porch simply done--my favorite style:

Again, the woods gave me what I needed:


~*~*~*~*~*~*~*~*~*~*~*~*~*~*~*~*~*~
Tis the season for adding that extra glow to our homes and here are a few things that I've done to my own so far. Use your imaginations and your creativity to bring that holiday shine to your house. There is no limit to the kinds of items you can buy or find in your own backyard. (And remember to check consignment shops). I don't spend very much each year---I add a few things, here and there, but mostly I use what I already have in new and different ways. And well, the country girl in me loves to walk in the woods behind my house to find evergreens, berries and pine cones. Add your own touches, your own pizzazz. And soon, your halls will be decked and even Jack Frost will be peeking in to see what wonders you've created.
Mantel in sports themed family room: pinecones, branches, small wicker balls, brown raffia, candles and lights:

Mantel in parlor-a collection of Santas, evergreens, gold roping and festive napkins used as a runner.

A book adds a nice touch to the wreath above mantel:

Even the powder room gets a Christmas touch:

Empty wine bottles sport holiday stoppers of ornaments and the candle holder is an upside down wine glass:

The family photos get some winter whimsy by simply adding red bulbs and a wreath:

Table in center of parlor:

Wrapping small boxes and adding these tags of
wonderful words is a nice touch. These "gifts" greet
visitors in my foyer.

Everything for these swags I found in the woods,
except for the ribbon, of course.


The bannister wanted some "bling":

What I hope you have this holiday season and all the year through can be found in the word on my stairs:

I made this look old by burning the edges of the paper, like it was an announcement from a long time ago.

The powder room mirror has its' own glow:

Reindeer flying up the staircase:

The hitching post outside--evergreens from the woods, ribbon and a red curtain tieback.

This speaks for itself---the words on the sign and the portrait below it:

This is as simple as it gets---a plastic snowflake ornament that I cut the inside out of, enough to slide over the candle.

This centerpiece is made of assorted bulbs placed on top of various sized glass candle holders:

The front porch simply done--my favorite style:

Again, the woods gave me what I needed:

~~~~~~~~~~~~~~~~~~~~~~~~~~~~~~~~~~~
I'm a big fan of signs with messages that lift your day or remind you of what matters. And since most of us spend so much time at the kitchen sink in some capacity, I thought having a sign right there would be wonderful. I made this one out of a piece of board I already had along with paint and stencils also in my bag of tricks. I change the sign with the season sometimes--one of the reasons this idea is so nice--you have no end to the words you can use. It's also inexpensive and one of a kind. Have fun creating your own!

Love the ideas...I am so sad because I think I threw out Joe's old hockey skates...I will have to look around . Any ideas on what to do with children's art? Nancy P.
ReplyDeleteHello Nancy...thanks for taking a look! I do have a few suggestions for children's art. Personally, I think it's the best kind of wall decor there is. Museums are wonderful places filled with great works of art by famous artists but there's just something so very sweet about the work of a child--those large heads on stick bodies with long eyelashes make-up companies would love to find a formula to create them! One idea is to frame the pieces individually in matching frames and then hang the frames in the shape of the child's initial---say 12 frames for "Timmy', the frames would be hung 5 across the top and another 6/7 down from the center frame on the top part. In doing this, you have the art work and the child's name represented. I've done this and it looks great. The child loves it, too! If you have lots of art work, then use the middle initial and the last one, etc. I have another idea and actually I think I'll put that together and post the photos on this page asap. Thanks again!
ReplyDeleteThese ideas are just fantastic!! So many of us want our homes to look special and can't afford alot of things but your ideas make us feel like we can have really neat homes without spending alot of money. I'm going through my attic looking for stuff to turn into decorations! Thank you!
ReplyDeleteI love your ideas!! I made the tissue box centerpieces for a baby shower and I couldn't believe how pretty they turned out and how inexpensive it all was! Everyone loved them. You should write a book. I'd buy it for sure!
ReplyDelete